Sans Digital MS2UTN+ Two-disk RAID System Installation
Contents |
Introduction
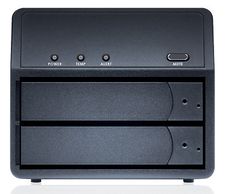
Recently, our group purchased a Sans Digital MOBILESTOR MS2UTN+ two-disk external hard drive enclosure and two 750 GB 7500rpm SATA Samsung Spinpoint F1 internal hard drives to back up one of the servers. The enclosure (shown in Figure 1) has a built in RAID controller with the following storage modes:
- BIG (not RAID 0): Concatenates the disks to create one large virtual volume. It isn't actually striping the data across the two disks so it will not result in faster performance. I suggest avoiding this. Total storage = 1.5 TB.
- JBOD (Just a Bunch of Disks): Both hard drives are completely separate. Your computer will see it as two separate external hard drives if you use USB, or if you have port multiplier (PM) support for SATA. If one drive fails the data on the other is still intact. Total storage = 1.5 TB.
- FAST (RAID 0): Data is striped across both disks to create one drive with twice the original storage. Using both drives to access data greatly improves read/write performance compared to that of a single physical drive. However, if one drive fails all the information is lost. Total storage = 1.5 TB.
- SAFE (RAID 1): Data is stored on both disks to create exact copies of each other. Data is not lost if only one drive fails; the broken drive can be replaced and the new drive can be mirrored off of the remaining one. Total Storage = 750 GB.
- SAFE 33 (33% RAID 1, 66% RAID 0): 33% of each disk is used for redundant storage using RAID 1, while the remaining is striped using RAID 0. Requires PM for SATA. Total Storage = 250 GB RAID 1, 1.0 TB RAID 0.
- SAFE 33 (33% RAID 1, 66% RAID 0): 50% of each disk is used for redundant storage using RAID 1, while the remaining is striped using RAID 0. Requires PM for SATA. Total Storage = 375 GB RAID 1, 750 GB RAID 0.
- GUI: Any of the above modes can be selected and changed using the GUI provided with the RAID controller (Silicon Image SteelVine 57XX series). This is available for download from either Sans Digital or Silicon Image.
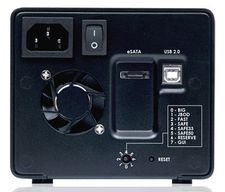
The desired storage mode can be selected/changed via the knob on the back of the enclosure and pressing the reset button shown in Figure 2 (warning: any data on the disks will probably be lost). For the current application, we chose to use the Linux GUI with RAID 1.
This device was installed on an x86 system running CentOS 5.0. However, the partitioning and formatting were performed on an x86 laptop running Ubuntu 8.04, because the partitioning and formatting programs on the CentOS machine were outdated, and it was desired to not attempt an upgrade of the system before backing it up.
Assembly & Setup
Assembling the Enclosure
The assembly of this device is fairly straightforward and outlined in the instruction manual. You will need to supply your own Phillips head screw driver. Simply remove the two trays using supplied "keys". I had to use the screws provided with the enclosure, because the ones that came with the hard drive would not fit the tray properly. Be careful around the exposed circuity of the hard drives when handling them. Insert the hard drives and trays into the case and power up the system. Select the storage mode (in this case GUI) and press the reset button. Now connect the drive to the computer; with USB it's as simple as plugging it in. Do not try to mount the drive or partition it just yet, though.
Choosing Storage Method with the GUI
Assuming you've already downloaded and unpacked the GUI software. I'm fairly certain all operations must be performed as the super user because you're working with a connected drive, but I haven't tried to verify this. First start the SteelVine service:
root@server ~]# cd 57xxSteelVineManager/
root@server ~]# ./SteelVine
Then open the GUI SteelVineManager:
root@server ~]# ./SteelVineManager
The Linux GUI appears to still need some work, because on both the Ubuntu and CentOS systems it gives numerous QT errors and warnings. However, they don't appear to affect the overall operation of the software. If you're unable to get it working on your system you may want to try the Windows version; it seemed to work fine with Windows Vista Business SP1.
The GUI comes with a very detailed manual on all the capabilities of the system, so I will only briefly cover the basics needed to get a working system. The default administrative password is "admin", which the manual doesn't tell you until page 20. The first thing that may seem alarming is that the Fan Speed box is Red with the message "PS". I think this may be due to the fact that the enclosure probably does not how a power supply fan. So far it hasn't caused any problems. The first thing you may want to do is configure email notifications and have it send a test email to you, so that you can know if something dies while you aren't around. To setup the drive storage just click on the Configuration Wizard, choose the storage method, and apply.
For SAFE, the drive immediately started to mirror the two drives. This took approximately 6 hours with the 750 GB hard drives. Once it finishes, it will immediately begin verifying the SAFE which takes at least another hour. Now the enclosure appeared as a single 750 GB unpartitioned drive.
Partitioning & Formatting
There are multiple ways to partition and format a drive in Linux and numerous file systems to choose from. I choose to use the standard MSDOS disk label with two primary partitions: a 150 GB partition for backing up the server's data and a ~550 GB one for backup of critical files from group members. You'll notice the two partitions don't nearly reach the claimed 750 GB capacity of the drive, because the manufacturers inflate their capacity figures by calling a GB only 1,000,000,000 bytes. Since this device was only planned to be used by Linux computers the usual ext3 file system was used on both partitions.
As stated before an x86 laptop running Ubuntu 8.04 was used to do partition and format the drive. Both operations were performed using GParted, a graphical tool available for Gnome and also as a LiveCD. The software is very straight forward. Select the disk; choose the disk label; choose the partition sizes and file systems; apply. The whole process took around 5 minutes.
Mounting the Partitions
Some operating systems will automatically attempt to mount partitions when a drive is connected, which is perfect if you plan on swapping the drive between computers, or not always having it connected. However, if you want these partitions to be mounted in exactly the same place each time the system is booted it's best to unmount the auto-mounted volumes and do it manually.
In order to mount the partitions on the computer you must first locate them in the /dev folder. Hard drives connected by USB or SATA are listed as sd&#, where & is a letter a,b,c... which represents a single connected drive, and # is a number for each of the partitions on that drive. In my case, sda was the server's internal hard disk and sdb1 and sdb2 were the 150 GB and 550GB partitions of the external drive, respectively. Mounted drives are traditionally placed in the /mnt directory (Ubuntu's auto-mounting places them in /media). For each partition you intend to mount you must first make a directory in the /mnt folder. I chose to use the descriptive names server_backup and group_backup:
root@server ~]# cd /mnt
root@server ~]# mkdir server_backup group_backup
If you don't want these partitions to be mounted at boot, ignore the rest of this section and simply run the commands with your appropriate locations substituted:
root@server ~]# mount /dev/sdb1 /mnt/sever_backup
root@server ~]# mount /dev/sdb2 /mnt/group_backup
Mounting at Boot
CAUTION: Be Careful when editing your fstab file. You could potentially stop your operating system from booting properly. In Linux, the information on where the partitions should be mounted and how are stored in the file /etc/fstab. Again this guide will only give the basic information needed to get the drive working properly; see the link below for a detailed description of fstab. Your file will have a form similar to this:
/dev/VolGroup00/LogVol00 /                       ext3    defaults        1 1
LABEL=/boot             /boot                   ext3    defaults        1 2
devpts                  /dev/pts                devpts  gid=5,mode=620  0 0
tmpfs                   /dev/shm                tmpfs   defaults        0 0
proc                    /proc                   proc    defaults        0 0
sysfs                   /sys                    sysfs   defaults        0 0
/dev/VolGroup00/LogVol01 swap                    swap    defaults        0 0
A new line must be added for each partition to be mounted at boot. This ensures that the partition will be mounted in the exact same location every time. In my case I added:
/dev/sdb1		/mnt/server_backup	ext3	defaults	0 0
/dev/sdb2		/mnt/group_backup	ext3	auto,user,rw	0 0
The first column is the location of the drive. The second is where it will be mounted (remember this directory must already exist before mounting). The third is the file system. The fourth deals with the mounting options, refer to the link below for details on the available choices. If in doubt, just use defaults. Finally the last two columns deal with file system checks. To disable them use 0 0.
Finally, the device can be mounted. Because, we've already told the computer where to mount the partitions in /etc/fstab we don't need to tell it where to put the partition:
root@server ~]# mount /dev/sdb1
root@server ~]# mount /dev/sdb2
If you ever need to unmount the drive simply repeat the preceding commands using umount.

